Welcome to my pet and family portrait blog. If you have commissioned a portrait you can see how it is progressing. If you would like to commission me to paint your pet, family or friend then visit my site at www.katetugwellportraits.com
Fancy learning how to draw and paint? See my art classes website at www.katesartclasses.com


Monday, 29 September 2014

Feline Friends


Two feline friends are the subject of my latest commission. The portrait is an A4 pastel on cream Daler Rowney Ingres Pastel Paper, the shade of which was tricky to choose as I wanted both cats to stand out equally. I considered a mid beige so the ginger cat would be lighter and the blacker cat darker but decided their eyes might disappear and it might not work, so light cream was selected. I opted for two photos where the cats could be drawn as if they might be side by side and sketched their basic shapes before mapping out the ginger markings on both cats. This initial application of pastel sits on the paper surface and looks very grainy so I smoothed it using a cream pastel pencil, which you can see in the second of the series. This process is repeated using a range of colours from bright reds, oranges and yellows on the ginger cat, to brown, grey, black and even green on the coat as well as the eyes. Once I was happy with the balance of tones I flicked in some white whiskers and moved onto blocking in the really dark areas on the other cat. I used cream, dark brown and grey pastel underneath the shiny areas of the coat and flicked in all sorts of colours and shades to keep the markings vibrant. I hope I've captured them!

Tuesday, 16 September 2014

Macon and Rully - Great Pyrenees


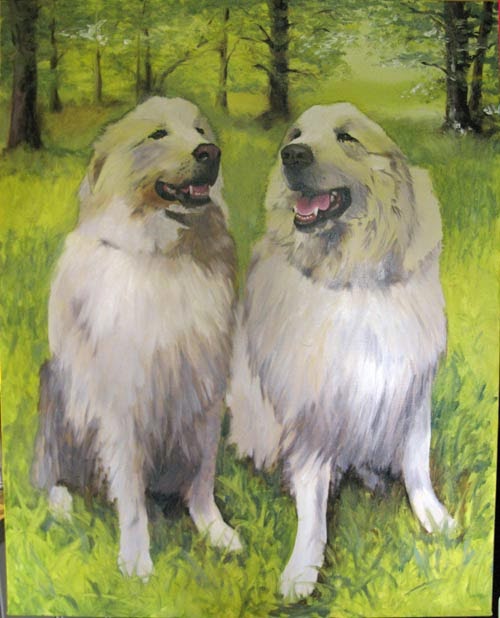
These two lovable dogs are now finished. As this is for a special birthday present I have been working on this solely to get it completed for the celebration party and the frame has been made at the same time. From the last blog entry many layers and glazes of paint have been applied, starting with the greens of the woods and foliage in the background. When the level of detail was becoming too much I moved my attention to Macon (on the right) and spent time getting the tonal layers in his fur more accurate using warm umbers mixed with varying levels of ultramarine blue and then when dry, layering titanium white over the top to create depths of fluffiness. This 'push and pull' of dark to light and back again is eventually what gives the portrait depth but it goes through some scarily dark changes to get there, which I've not shown. Next, ultramarine and crimson were mixed in varying levels with white to create the bluebells which I randomly painted in with large brushstrokes and added more detail to the trees. At this point I decided the greens were too bright so painted a dark glaze across the whole of the picture to knock the intensity back and lifted out the dogs before it dried. Unfortunately I dropped my camera last week when I leapt out of my car so the second last picture was taken with a tablet and is a bit grainy. Never-the-less, you should still be able to see how both dogs are looking more 3-D and the bluebells are more detailed. Finally, details were sharpened and their fur softened and brightened. As this is in oils the portrait has a lovely rich lustre and I can't wait to see it in its decorative frame.

Wednesday, 27 August 2014

Macon and Rully - Great Pyrenees


This latest commission an oil painting of Macon and Rully, two fun-loving Great Pyrenees dogs who like snapping at builders' bottoms! I visited them in their new home to take their photographs and after an albumful of snaps, we settled on the two photos which best describe each individual personality. The owners wanted them facing each other and set in local bluebell woods so I sourced some pictures from a photographer friend of mine as well as the internet and mocked up some photo-composites. After playing around with the composition I ordered a fine linen canvas size 24 x 30" from Harris Moore who make them to measure. I primed the canvas and painted a sunshine yellow in a mixture of cadmium, lemon and ochre. When that had dried I drew the dogs in place. Using titanium white and burnt umber I started to block in the main areas of tone, mixing crimson and ultramarine with the umber to get some rich darks. Next I concentrated my paintbrush on getting some texture into the background and painted in some trees. With a finer brush I started work on their faces and continued putting more shadows into the background to make the white of their coats leap out. The oils I use dry relatively quickly so I can come back the next day and apply more layers without too much merging of colour. The next stage of the process is what my artist friend, Robert, always calls the 'A' level phase' - when the initial painting, with it's naive brush strokes and energy, gets lost as layers of detail are applied. It's easy to think you are wrecking the portrait at this stage but it is a necessary part of the process in order that depth and accuracy are achieved. Right, better get back to painting...!

Thursday, 7 August 2014

Laura's 21st birthday portrait


This is Laura, she's 21 very soon so her mum has commissioned an A3 pencil portrait for her birthday and sent me some pictures of pencil drawings other artists had done so that I could see the style of drawing she wanted. First off I spent a while trying to get the composition and cropping right for the size of the portrait. A close crop with Laura's face quite large would have worked well but we opted for a lovely classic composition to show off as much of her hair as possible. I sketched the main features using a 2B pencil on acid-free cartridge paper. Once I was happy I had a likeness I started to lightly shade her skin tones with an HB pencil to create soft, light, even shadows. Using a softer lead would have left too much of a granular texture and I want her skin to look smooth so I use blending stubs as well as different pencil leads. With the skin tones finely blended I took an 8B to establish the darkest areas of the portrait which included her eyes and the shadows in her hair. A strong shadow on the left side of the drawing enhances the shape of Laura's face while the shadow on the right remains soft. Next I used a sharpened HB to sweep in the lines that make up Laura's hair. There is no short cut here - each hair has to be drawn including the ones that escape out to the sides! Finally a little darkening of the shadows and a signature completes the portrait.

Friday, 18 July 2014

Michael and pug puppy


This is Michael who is about to turn 21 with his new(-ish) Pug puppy. I have been commissioned by his relatives as a birthday gift to paint him in pastel on A3 pastel paper. I chose a velour pastel paper in dark grey and sketched Michael with the puppy closer to his face and with a more natural grin using these two photos as reference. Once happy with the composition I blocked in the main colours with my Conte pastels. I had to mix the colours as the flesh tint was too orange so I used white, cream pencil pastel and pink to get the skin tones about right. Next I sharpened my pastel pencils and put the darks in accurately, concentrating on the shapes of the eyes, nose, ears and mouth. I wanted to draw the T-shirt quite sketchy to keep the focus on both faces. I added red, blue and grey as well as browns into the shadows but kept my palette fairly limited. Lastly I tightened up on the details, added a tiny amount of shadow to the background and re-visited all of the photos provided to focus on the likeness, especially on the dog. I think I've got them but will have a look with fresh eyes again tomorrow!!

Wednesday, 16 July 2014

Sidney


My latest pastel portrait is of a very sleepy dog called Sidney. I did a portrait of another sleepy dog of theirs called Daisy and they have come back again, this time wanting a special birthday gift. I sketched the basics onto an A4 sized grey Velour Pastel Paper then picked a white pastel to block in the shine on his coat. I used oranges and browns to block in other areas of colour especially on his ginger fringe which apparently is his main feature! I worked on the picture with other brown pastels, picking out subtle shade changes, and then put black into the shadow areas. The final picture in the series is a bit of a leap as lots of details have been put in including the eyes, with pastel pencils. Shades of green and blue have been added to enhance the red/orange hues and finally a hint of the sofa Sidney is snoozing on is hinted at! It's a dogs' life...

Saturday, 28 June 2014

Three Golden Retrievers


These three canine friends are now complete - layers of pastel have been applied over a period of days. Following on from the last blog entry, as I had already laid the base foundation of colour, I took my black pastel and focussed attention on the dogs' faces. I spent time making sure I captured the character and getting their features down accurately. I also used brown and grey pastel pencils to pick out the highlights. I used pinks, reds, purples and browns on their tongues and took care not to smudge the black to totally change the expression on each face. The next stage was to look at the general highlights and shadows so I put marks into the shadows using a dark brown pastel and white and cream for the light areas. I smudged in dark shadows under the dogs and having decided not to get more photos of their paws or introduce green grass, I created a texture for them to stand on that used the same colours as their coats. The last stage involves assessing the picture as a whole, adding more texture, balancing tonal values and sharpening up details. I'll look at it again tomorrow but I've signed it off as finished.