Welcome to my pet and family portrait blog. If you have commissioned a portrait you can see how it is progressing. If you would like to commission me to paint your pet, family or friend then visit my site at www.katetugwellportraits.com
Fancy learning how to draw and paint? See my art classes website at www.katesartclasses.com


Tuesday 24 December 2013

A Portrait of Tom


This portrait of Tom is to go with the portrait he commissioned of Linda earlier in the year. He had talked about perhaps getting his own painted too and I wanted the backgrounds to match. So before I sent him the finished painting of Linda I made a note on another canvas of the colours I used. As it happens, the photo I'm mainly working from is the same one used for Linda so at least the lighting is the same which makes it easier for me to match skin tones etc. After sketching his face onto the partly painted box canvas I started to paint in the main features and shadows. I blocked in the shirt and put pink on the background as that's how I started the portrait of Linda. I mixed up skin tones to get rid of most of the white of the canvas so that I can see subtle shades and hues later. Then I worked on the background to get as much of the colour to work as I remembered. I think I've already captured his likeness, I just hope I can keep it through the middle stages! It's the Christmas break now so I've downed tools until next year. Wishing you a Merry Christmas and a Happy New Year!!

Monday 25 November 2013

Kobi and Diesel finished pastel


This is the finished portrait of Kobi and Diesel along with coloured collars. In the final stages of the pastel portraits a lot of additional layers of pastel are added but very little seems to change on the photos, so I tend to take the photos further apart. You can perhaps 'spot the difference' around their muzzles and neck compared to the initial stages. I hope I've captured their personalities along with their shiny coats!

Friday 15 November 2013

Kobi and Diesel pastel


My latest pastel commission of Kobi and Diesel starts with a photo of them both looking very happy in the back of their car. The sunlight has bleached out some of the details so other photos have been used as reference alongside. After sketching their heads closer together onto A3 Ingres Pastel Paper I used my larger Conte pastel sticks to block in the light and coloured areas of the dogs. This layer was blended and corrected before black and grey areas added to the shadow areas very carefully. I swapped between Conte pastels and pastel pencils to ensure accuracy and blended with white into the highlights. They are both coming on quite well but I need to know whether to include their collars before continuing with the detail.

Sunday 3 November 2013

Robbie (Striding Edge) greyhound pastel


It's always lovely when you get a recommendation and this commission came off the back of an A4 pastel I did a while ago. The owner of this greyhound also walks the dog in the portrait I did! He wanted the same size and medium for his commission so I set too on Ingres cream pastel paper, lightly sketching the main outline before positioning the eyes and ears. I started mapping out areas of colour using Conte Pastel sticks and smudging the pastel right into the 'tooth' of the paper. I tend to work from the top left down to avoid smudging as much as possible, especially when working on light paper with dark colours, and I also like to paint the eyes near the beginning as the portrait hangs on getting these right. In the next stage I worked in different shades of greys, browns and blues into the coat to give it depth, mixing the Conte Pastels with Faber-Castell Pastel Pencils where I needed more detail. I continually check my tonal values with the photo and add blacks, whites and blues accordingly - the top coat had flecks of white and black dotted in to create the texture and detail in the coat. Finally his name and racing name to complete the portrait.

Wednesday 2 October 2013

Another Special Portrait


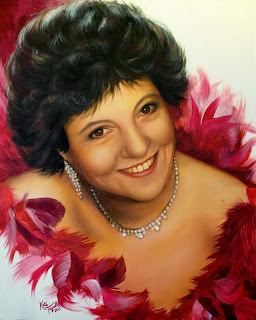
Val is now finished, looking very glamorous surrounded by red feathers. I'm really pleased with the way she looks and I like her sparkly jewellery. So, following on from the last blog entry I focused my painting on the eyes and mouth again, switching to a rigger to apply fine details like eyelashes, eyebrow hairs, colours in the iris and gaps in the teeth. I also kept revisiting the skin tones, adding glazes of cadmium yellow and burnt sienna as well as introducing green into the shadows. I painted the dark areas of the necklace and earrings to define the stones. With the hardest part almost complete I moved on to paint her hair, adding in various shades of brown and red to reflect the feathers. Then I had fun painting the feathers, flicking some luscious reds and purples onto the canvas with a wide flat brush. I brightened her lipstick a bit and was fairly happy it was finished but decided that by creating a diagonal from corner to corner with the red, I would be able to put more shine in her hair. And finally, with more shine on her hair I scumbled more white around some of the diamonds to make them shine more too.

Monday 30 September 2013

Another Special Portrait


This is another special portrait of a very glamorous lady called Val who sadly is no longer with us. Her husband, Maurice, has commissioned this painting from a very clear photograph (which always helps) and I'm changing the blue feathers to red! I started with a primed 16 x 20" canvas board and sketched her in a portrait format. When I was happy with the likeness and composition I applied areas of flesh coloured acrylic paint by mixing cadmium red, white and yellow ochre, and dark brown for her hair and eyes. I continued to use glazes of colour to build up the varying skin tones by including crimson, violet, cadmium yellow and raw umber into the mixes. I like to get the eyes and mouth right early on in a portrait as this is where the character of a personality of the person starts to shine through. I haven't put all the dark areas in yet but the shapes and hues and tones have placed them nicely. I added some red feathers to help me visualise where this colour might reflect on the face. Now with the basic layers of colour laid down I am working on tonal values to bring her out of the canvas. Keep posted as there's still some work to go...

Saturday 28 September 2013

A Special Portrait


This is a portrait of a lovely lady called Linda who very sadly died of cancer last year. Her husband, Tom, commissioned me to paint an 18 x 24" acrylic portrait of her onto a box canvas and sent me the few photos he had to work from. She had a sparkly warm smile which I wanted to capture on the canvas so I started by painting the whole canvas a warm pink colour, which I picked out from her blouse. When that was dry I sketched her head and shoulders onto the canvas and as the graphite didn't show up terribly well I continued drawing with paint and blocked in the main shapes and colours. Once I had mapped the features and was happy with the under-painting I started to build the layers of paint to create the skin tones. The pink acted as a lovely binding colour on the face, as the fine glazes still let some of the colour come through, but it was a strong colour to leave in the background which I had always intended to paint dark green. At this point I sent a photo of the portrait to Tom who also wasn't keen on the pink, so that helped with the decision to go green! I still liked the idea of keeping some of the pink showing through to create harmony across the whole picture. Painting the background darker had the effect of highlighting her blouse, so after painting in her hand and working more on the overall skin colours, I focused on the pattern on the blouse. This was a painting in itself and took quite a few layers to get right! I worked on her jewellery and eyes until I was happy I'd got them right then referred to other photographs to complete her hair.

Monday 23 September 2013

Pastel of a Hong Kong Rescue Dog


This is Casper, a beautiful Hong Kong rescue dog of mixed descent, whose portrait is a large 16 x 20" pastel painting! A lot of photos were sent across and the pose chosen for the head shot. I started by sketching the outline lightly on Canson Mi-Tientes pastel paper then blocking in general areas of colour, pushing the pastel into the tooth of the paper. These were generally cream, white, yellow ochre, orange and dark brown. After this base layer was thoroughly smudged I added more tonal contrast, concentrating on the eyes and nose details and adding a strong second layer of white. Next I introduced a wide range of colours into the coat including pink, purple, yellow, red, grey, browns and even green! These colours when blended together give stronger shadows and a more interesting, natural looking coat, even though the photos didn't reveal a huge amount of detail for me to follow. I started to add texture using flicks of differing colours using pastel pencils, checking the tonal values matched the photo. Finally I sharpened up the details in the eyes, nose, mouth and ears, still keeping a soft look for the fur.

Sunday 21 July 2013

A beautiful couple and their dog

I've lived with this portrait for a long time and I'm really pleased to have finished it! It's been one of the most difficult to come out of the end of my paintbrush: some flow easily and others seem troublesome with every stroke and every mix of colour. No reason for it - just the way art works and I've spent hours tweaking and fiddling but I'm pleased with it now and feel I've got a good likeness. The couple are lovely, so the subject was a joy, but the lighting and quality of photos was a challenge. Their dog was added in from a different photo which had very little detail and a different light source. New photos helped a little but I still had to work out where the light would hit the dog's head in between the couple. It has been sitting on one of my easels so I've been able to assess it and paint a bit every time I've walked past but am embarrassed by how long this one has taken me. Anyway, I'll be pleased to finally send it and I hope the couple are thrilled with being able to receive it (at long last!)

Monday 8 July 2013

Silver clay making course


In the midst of working on commissions and teaching a series of summer art workshops I took time out last Saturday to attend a silver clay making course with a couple of friends and it was so much fun I decided to include it in my blog - after all, it's another creative pursuit! The courses are run by Paula Louise Paton in her workshop/Aladdin's cave near Newick in East Sussex. We had just 16g of PMC or precious metal clay to play with, which seemed very small when I removed it from the packet, but in just a day I made much more than I thought I would, especially as I chose the biggest leaf cutter for the first piece. Paula demonstrated how to roll out the clay to the desired thickness using the thickness of playing cards as a measure and showed us how to stamp textures into the surface, make molds and use existing molds, how to hand fire the silver using a blowtorch, stick bits together using silver paste. We learned loads and at the end of the day our little lumps of carefully carved and shaped clay went into the kiln brown and came out silver (well white actually). Pure alchemy! And with some soldering of jump rings and earring backs, a bit of polishing up and patinating we all felt very pleased with ourselves and had a right laugh to boot!! Here's a pic of all the bits I produced and if you'd like a go yourself check out: http://www.learnsilverclay.co.uk but I'll warn you, it's pretty addictive and could be quite a costly hobby.

Wednesday 3 July 2013

Three Generations


Another relatively small portrait, this time in acrylics, is of three members of the same family but three different generations. I started work on a 12 x 16" Loxley canvas board, painting earthy colours over the background first. Next I spent time drawing the figures onto the canvas, taking care to get their features in the right place. I blocked in the colours of their clothing, adding shading while the paint was wet on each section and blending it in. Then I started the fiddly task of putting their features in with the smallest brush in my studio. Most of the painting was done with a size 0 rigger and minute blending of colours to get the tones in the right places. I deliberately kept the background loose so as not to detract from the detail and darkened the areas near their faces to help them stand out more. This was a very fiddly portrait as I don't often work that small on facial features but I think I've got their likenesses. A good judge is comparing it on my computer as you can see both the photo and the portrait same size side by side. The best judge will be the family themselves!

Tuesday 2 July 2013

Portrait of a Weimaraner


I have been working on a few commissions at the same time at the moment and this is a relatively small pastel (9 x 12") of a Weimaraner called Daisy. Apparently she loves to sleep a lot so the chosen pose was of her just about to drop off. I chose a beige velour pastel paper both for the texture and colour as I wanted to create a soft, warm portrait with a seemingly limited palette. I started by blocking in the main lights and darks with my Conte soft pastels. In stage two I added yellow ochre and other bright oranges and yellows as well as a warm burgundy brown into the shadows. The paper surface doesn't require any blending so I kept on working more pastels into the portrait until moving on to using pastel pencils from stage three onwards. Here I flicked in all sorts of shades of browns, oranges, yellows and whites, darkening up the shadows and details before finally adding some texture to the top of the cushion and my signature! 

Portrait commissions on the go


The portrait of this couple is nearly finished but their dog still needs some work. I'm waiting for a more detailed photo but have also been trying to source some other examples. The challenge is that I'm adding in an additional bod where the light source is in a different direction. The light on the couple is strong sunlight coming from behind so although the dog is in shadow he may also catch a shaft of light coming in between them. Since the last entry, many of layers of paint have been applied to the skin tones and fine details added which I appreciate are more difficult to see at this size. Hair highlights were applied with a sword liner brush and lots of colours were layered up to create shine on dark hair and make the curls look convincing. More details were added to the shirt although my aim is to keep the clothing looser in style and more painterly.