Welcome to my pet and family portrait blog. If you have commissioned a portrait you can see how it is progressing. If you would like to commission me to paint your pet, family or friend then visit my site at www.katetugwellportraits.com
Fancy learning how to draw and paint? See my art classes website at www.katesartclasses.com


Wednesday, 23 February 2011

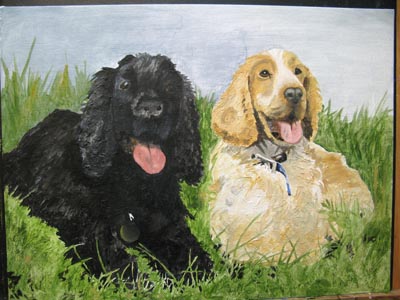
Two happy spaniels


This new commission is a gift from a lady to her son who is 40 on the 20th March this year - exactly the same as me!!! I've never met anyone whose birthday is on the same date as mine let alone the same year. Anyway, I started by sketching the dogs onto a 12 x 16" canvas board, painted in the background and picked out the eyes, nose and mouth with black paint. Then I built up texture using texture paste which obliterates most of my pencil marks so by painting in the background, which I just want to be flat, and the features, I stand a better chance of keeping everything in proportion. After leaving it to dry overnight I painted the grass then started adding the shadows and main features of each dog. After that I set to work on the black spaniel, Jake, making sure I painted in the highlights of his coat where I could make them out on the photo (black animals are the hardest to paint well). Then I gave Max, the cream and ginger spaniel, an undercoat and have left it all to dry. I'm not even half way through the painting process yet: when I next go back to it I will begin to build up the layers of colour to create a more 3-D effect, correcting the colours as I go and referring to the other photographs supplied. This is the bit that takes the most time but worth it for the end result!
Friday, 18 February 2011

Beach sunset


This large painting is of Freshwater West Beach in South Wales was commissioned by a couple who got engaged there at sunset a few years ago. It was a tricky composition and I have seen photos and paintings of this beach taken from the sand dunes further round the bay but Mr and Mrs Leppard wanted the view from the south side of the bay. I started by drawing a grid onto a 24 x 48" deep edge box canvas and a corresponding grid on my reference photo so I could get the rocks in the right places.Then I painted the edges dark red to tie the canvas into the couple's room decor. I built up texture on the canvas using texture paste then painted the shadows and rocks in black. Next I added colour, building up from light to dark and referring to a variety of alternative photographs of sunsets and skies. My aim was to create a mood rather than a totally realistic sunset as originally the brief was to limit the painting to just three colours.

Sunday, 19 December 2010

A Christmas Angel

Here's the finished version of my little Christmas angel - she's so cute! As you can see in these last three stages I continued to work on her skin tone and hair, adding in different colours and shades for depth. Finally I worked on her eyes to make them really stand out as they are such a gorgeous blue. I'm sure she'll be brightening up her family this Christmas!

See some more examples of my child portraits.

Wednesday, 8 December 2010

A Christmas Angel


This gorgeous little girl is another portrait needed for Santa to deliver so the first three stages are done. I am painting her on a 16 x 16" box canvas and decided not to use texture paste on this portrait as her skin is so delicate I thought I'd let the canvas create any texture needed. I painted light shadows and a wash for the skintone first and made a point of bringing out her eyes, as these will be the focus of the painting. Then I added more colour to her clothes, hair and background and continued to paint fine glazes to gradually build up her translucent skintone. I can't be bold with the shadows on her skin as it will look too heavy so I'm adding paint very lightly and blending it in as I go (mostly with my fingers!!)

See some more examples of my child portraits.

Thursday, 2 December 2010

A Portrait for Christmas


This portrait is now ready for Santa to deliver! For the last three stages work goes into getting the skin tone right by adding layers and layers of different coloured glazes. I added reds oranges and purples to lips, ears, neck and around the eyes; yellow and burnt sienna to the sides of the face, chin, forehead and under the eyes. I added light brush strokes of paynes grey to indicate slight stubble and used the same colour to darken his hair with highlights of titanium white to finish off.

See some more examples of my family portrait paintings

Tuesday, 23 November 2010

A Portrait for Christmas


My latest commission is a portrait for Christmas and it's a surprise, so if you have stumbled upon my blog and you know this gentleman, shhhhh!! The size is 12 x 16" on primed artboard and after sketching the basic outline I started painting the shadows in paynes grey and burnt umber. Next I roughly painted in his shirt, jumper and hair. I used up the remainder of the blue paint as a wash for the background before building up warmer shadows on his face and used a small brush to add a base colour to his eyes. From there I have started to apply the many glazes required to build up a translucent skin tone so for now he looks quite tanned and his laughter lines and shadows are well pronounced. I'm quite pleased with the first few stages - keep watching to see it progress!

Thursday, 4 November 2010

Dog painting - Acrylic on MDF board


Freeway and Bee Bee are now finished and looking cute. The final piece is at the top plus a couple more stages to follow on from my last post: I darkened the background before working on Freeway's ears. Then I turned my attention to Bee Bee and tried to make the hair look slightly coarser than Freeway's. I kept fiddling, adding in more detail and making sure the colours balanced based on the photos supplied, et voila!! I hope they like their portrait (and the owners too!)

See some more of my pet portraits from photos